Tuesday, October 29, 2013

Simple Stories Review & Giveaway!

Today I have an awesome giveaway to share with you all! I'm always on the lookout for great albums and Simple Stories has hit the mark with their new faux leather albums that come in both 12x12 and 6x8. I had the chance to check out the teal 12x12 album and a variety pack of the page protectors recently.

Albums_Teal 
4047-01 copy 

The albums are just beautiful! I love the stitching and the cover looks like it will hold up well. I like the metal corners and I know they will stay nice over time. 

I love the variety of page protectors offered to go with the albums. I don't tend to scrapbook in a pocket page style but I decided to put together this quick page of the girl's first day of preschool using the Smarty Pants collection. I put this together in probably 15-20 minutes. The hardest part was editing and printing the photos. I love that the slots are all in the inner part of the page protector - nothing will fall out of the top! The page protectors are nice and thick as well - I don't think I will have to worry about them tearing or falling apart. The pockets are also true to size - there is not need to trim down 3x4 and 4x6 photos and cards - they will fit the first time! 

If you are not a pocket page scrapbooker, Simple Stories also has 12x12 page protectors that go with the albums as well. As quickly as this page went together, I might be persuaded to include a few pocket pages here and there! 


Now, here's the fun part! I get to give away one faux leather album of the winner's choice (either 12x12 or 6x8) and one package of page protectors.

Just leave a comment here on my blog and I will choose a random winner next Monday, November 4th! International comments are welcome!

Friday, October 25, 2013

Emma's Paperie: Cards Part 2

Happy Friday! Hope you all are looking forward to the weekend. We have some early trick or treating planned for this weekend as long as everyone is healthy. Wednesday I got the dreaded call from preschool that I had a sick girl to come pick up. She missed yesterday too and I think she still has a fever today. Poor girl. 

Today I have more cards to share for Emma's Paperie and these all feature products from October Afternoon. 

The first one is the Woodland Park collection. I love those sweet butterflies that I dressed up with a couple of brads.


For a complete supply list, please visit the Emma's Paperie blog here.  

I love the Cakewalk collection as well - perfect for creating birthday cards. I highlighted the stars by adding extra star stickers of the same color on top. 


For a complete supply list, please visit the Emma's Paperie blog here.  

And this one features Travel Girl and I thought it would make a great graduation card. 


For a complete supply list, please visit the Emma's Paperie blog here

Thanks for stopping by today! I hope you all have a great weekend!

I'll be back on Monday with a Simple Stories giveaway!

Thursday, October 24, 2013

Emma's Paperie: Cards Part 1

Good morning! I love creating quick and easy cards and over the next couple days I am going to share some that I have created for Emma's Paperie the past several months. The first one features the Sweet Notes collection from Webster's Pages.


Those 3x4 journaling cards make easy card fronts to decorate and embellish.


For a complete supply list, visit the Emma's Paperie blog here

The next card was fun to create and features My Mind's Eye products. I cut out each individual frame and then embellished with buttons, brads and enamel dots.


For a complete supply list, visit the Emma's Paperie blog here

And finally, here is another card featuring the same collection by My Mind's Eye. I placed the quote patterned paper inside a Pink Paislee frame.


For a complete supply list, visit the Emma's Paperie blog here.

Thanks for stopping by today! I'll be back tomorrow with a few more cards!

Wednesday, October 23, 2013

Emma's Paperie: Christmas Pajamas

Good morning! Today I have a new layout to share for Emma's Paperie that features the Santa's List collection by Teresa Collins. This collection caught my eye right away when it came out this summer. I love the traditional Christmas colors with black, white and the neutral khaki. Every year we get new Christmas pajamas for the girls and this is what they wore last year.


The background paper I chose already had the glitter diamonds with the Santa and text so it was easy to build right on top of that. 


Our feature at Emma's Paperie was to use envelopes. Rather than use patterned paper, I chose four envelopes in the collection and made a grid with them.

The journaling is tucked inside the polka dot envelope. 


For a complete supply list, please visit the Emma's Paperie blog here

Thanks for stopping by today! :)

Tuesday, October 22, 2013

Emma's Paperie: New Kitchen Gifts

Hello, hello! Thanks for stopping by my neck of the woods today. I'm sharing a new layout for Emma's Paperie today - this time featuring Farm House Paper Company and their Country Kitchen collection. This summer my oven starting giving out so we went shopping for a new stove. It coincided with our 10th anniversary so our new gift to each other was this beauty and a new microwave too. I love to cook and bake and am fairly practical so this was more exciting to me than anything and my whole family will benefit from this gift! :)


I placed patterned paper inside this frame from Heidi Swapp and embellished with a wooden Prima button and Maya Road stick pin.


The little wood house is by Prima as well.


I used one of the chipboard tags to hold the title and I'm really loving the envelope!


For a complete supply list, please visit the Emma's Paperie blog here. This was fun for me to document - I'm trying to expand my usual subjects behind just my two girls. 

Have a great day!

Monday, October 21, 2013

Emma's Paperie: Fabulous at 4

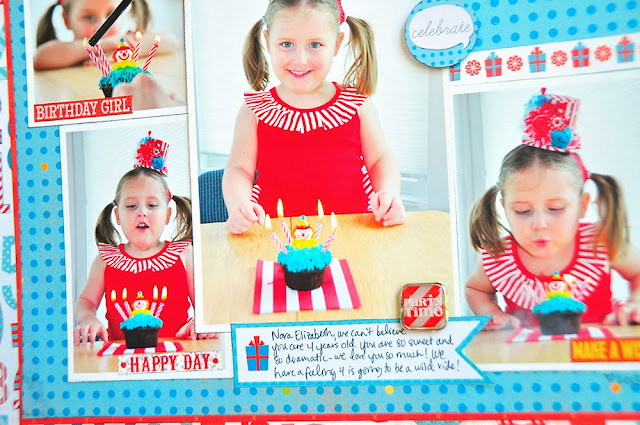
Happy Monday! Hope you all had a great weekend! Today I have a new layout to share for Emma's Paperie that features the Surprise! collection by Bo Bunny. The collection has other colors in it but I pulled out the reds and blues to match photos of Nora blowing out her birthday candles this past spring.


This collection has a lot of great stickers, brads and chipboard that make embellishing easy! 


I was able to add sentiment stickers to each photo to help tell the story. I just love creating birthday layouts!


For a complete supply list, please visit the Emma's Paperie blog here.

Have a great day! :)

Friday, October 18, 2013

Emma's Paperie: Welcome 2013

Happy Friday! Today I have a layout to share for Emma's Paperie that I created with mostly the Mayberry collection from American Crafts. We always have a fun New Year's Eve party at home with the girls' grandparents and this year the girls were animated as ever! :)


I used one of the the chalkboard stickers to hold the numbers for the year. 


I also added several wood veneer pieces - the ruler is by Prima, the circle frame by Studio Calico and the wood veneer card by American Crafts.


Thanks for stopping by today! I hope to play catch up next week with more projects for Emma's Paperie. Have a great weekend!

Thursday, October 17, 2013

Gossamer Blue: Oktoberfest

Hello! Today I have one final layout to share with the October Gossamer Blue kits - this one is created just for the Gossamer Blue blog! This month I was excited to finally have a Silhouette Cameo in my arsenal of scrapbooking tools. I think that I will be reaching for it and over and over again to add fun cuts and texture to my pages. For this two-page layout I focused on an Oktoberfest event we went to last fall and all the fun activities we did as a family. We even had our photo taken for our local magazine!


I found a set of beautiful fall leaves in the Silhouette store and cut them out of white cardstock. I backed the leaves with bits of patterned paper and cards from the Life Pages kit.


I placed my title on one of the 4×6 Life Pages cards and embellished with Amy Tangerine photo corners and a Crate Paper wood veneer piece.


On the second page, I used more exclusive Life Pages cards to hold my photos as well as a card from Elle’s Studio.


Finally, when I am designing a two-page layout I tend to create an symmetrical design with elements that match on both pages. On the second page, I also cut the leaves with the Silhouette file and backed them with patterned paper.


I’ll be back next month with another two-page layout with the November Gossamer Blue kits!

Thanks for stopping by today! :)

Wednesday, October 16, 2013

Gossamer Blue: We Love a Spooky Night!

Good morning! Today I have another layout to share with you using the Gossamer Blue October kits. This one uses a lot of the Life Pages themed add-on kit and I love how well it coordinates with elements in the main kit and other add-on kits. I pulled out my Cameo to cut out the spider web for the corner and well as the "spooky" part of my title. This layout highlights trick or treating last year at a local mall.


I tucked a Pebbles pocket behind one of the photos and placed my journaling on the card inside. The "boo" sticker is also by Pebbles.


I also really loving these transparent frames by Pebbles! They are perfect for covering a photo or for placing a photo on top. 


Thanks for stopping by today! I'll be back tomorrow with one final Gossamer Blue layout with the October kit.

Tuesday, October 15, 2013

Simple Stories: Merry Memories Album

Hello Simple Stories friends! Today, I am sharing my "Merry Memories" album with you all. This is a photo-heavy post so sit back and enjoy! I approach the concept of a December Daily album very differently. The thought of creating a page for each day of December stresses me out! And there are some days where we do A LOT especially close to Christmas. So instead, I create my album based on 31 memories during the month of December. I have one page for each memory/tradition and go from there. I created my album using one of the red Sn@p 6x8 binders, the December Documented collection and the Christmas Sn@p sets.


I cut the trees and present out of one of the transparencies to decorate my cover. The base is a sheet of the black "chalkboard" basics that I cut down to fit and then embellished the centers of the snowflakes with rhinestones. I also adhered some of the stickers and chipboard to the cover. I did add a stronger adhesive to these pieces because the cover will be handled the most.


On the inside, I adhered one of the December Documented pockets to serve as a catch all for memorabilia or Christmas cards we receive. I use the three chipboard divider pages in the album to seperate days 1-10, 11-20 and 21-31. The divider pages serve as a nice break and it's a good place to put additional photos or journaling if needed. This year I took the die-cut Sn@p pages and made pockets with vellum and sequins behind the sheets. Then I adhered the sheets to the chipboard divider.


I always like to start my album with our family Christmas photo so that is what will go on page 1. As you can see, I set the pages up very simply with a number, Sn@p cards and sometimes patterned paper in each page protector. 


I like to break the album up by using the page protectors, the insert pages and the Sn@p pages as well.


Here is another divider page with the die-cut page, vellum pocket and sequins.


And here is the final divider page...


I always like to include a summary of the holiday season and I do so on the final page.


I hope you enjoyed looking through my base pages. I actually think I am going to use this album for 2010 because I have plans to create another album for 2013 with a kit from Gossamer Blue. 2010 is the one year that I didn't get a chance to create an album since the girls were born. I love how this one turned out so I am anxious to start filling it with photos and journaling! 

Have a great day!

 
Site Design By Designer Blogs