Sunday, September 11, 2011

Authentique Paper Tutorial: Halloween Decor

Good morning! I have a little tutorial to share with you today to create your own Halloween decor - perhaps a spooky sign for your front door? The "Glowing" collection by Authentique Paper is perfect for all your Halloween home decor and now is the perfect time to get creating! Take a look at my "Happy Haunting" sign:


I picked up this black metal sign at my local Michael's a couple weeks ago (and I'm so proud of myself for using something I bought right away - admit it, you do it too!) :) I tied some black glitter tulle in a bow on the top on the wire hanger. 


To distress my patterned paper, I simply used some black paint and a foam brush. 


Once that was dry, I machine stitched around the edges for a little extra texture. 


I used a wet adhesive to adhere the patterned paper to the metal sign and then tied a piece of orange ribbon around the front of the sign in a knot. I also glued a die-cut piece from the "Glowing" Icons sheet to the bottom. 


Next, I cut a piece of this mirrored sprig that I found in the Christmas section at my local Hobby Lobby. It was black and silver so it went with this project perfectly. 


I hot-glued the sprig (that ended up looking like a really cool tree) to the bottom of the sign. 


The ghost was cut from a Halloween pick that I bought at Hobby Lobby and hot glued to the center of my tulle ribbon. The little "Boo" die-cut is from the "Glowing" Noteables sheet. 


And here's the finished piece again! 


A couple close-ups....


Boo! :)


Supplies:
Authentique Paper: Glowing Patterned Paper (Newsprint, Harlequin Patches); Icons Front; Noteables Front; Headline Front
Michael's metal sign
Black glitter tulle
twine
black paint
assorted Halloween "floral" picks
Jenni Bowlin button

Thanks for checking out my tutorial! All of us at Authentique Paper would love to see your spooky creations! :)


Friday, September 09, 2011

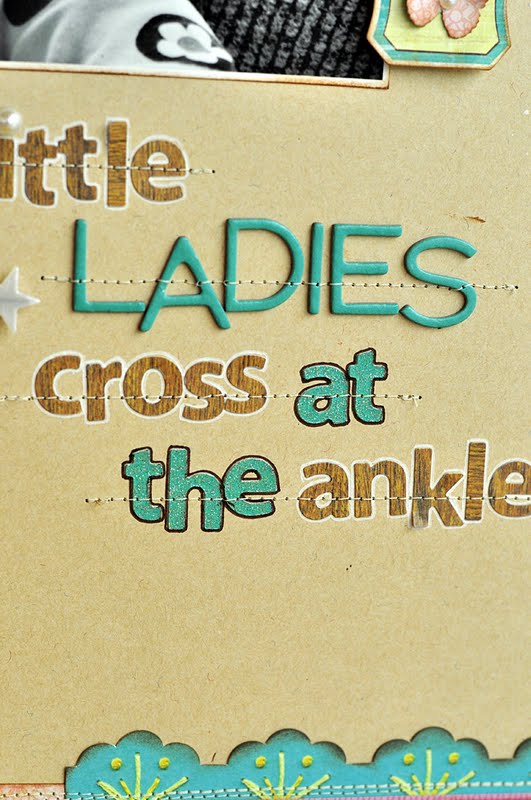
Little Ladies Cross at the Ankles

I love scrapping about my girls' little quirks....just little things I want to remember about them at their age. When Nora is sitting on the couch or a chair, she almost always crosses her feet at the ankle. It's so funny and something sweet about her that I'm glad we were able to capture. I used the very feminine and lady-like "Mary Ellen" kit by Noel Mignon for this layout to create a hodge podge of little bits and pieces. 


For this grid, I punched some starbursts from patterned paper, layered Crate Paper stickers and brads, and added a little punched butterfly with a pearl center. 


I'm still in love with Sassafras Lass "foldies" and used a few flowers as an accent. I also layered an October Afternoon label sticker, a My Mind's Eye sentiment sticker and Maya Road star pin. 


The alphabet stickers are all from past kits: Sassafras Lass woodgrain from The Bee's Knees, Sassafras turquoise glitter from Very Virginia, American Crafts thickers from Jump & Jive. 


Have a great Friday! :)

Thursday, September 08, 2011

He Loves Her

Good morning! I'm very excited to be sharing a layout with you today for Authentique Paper using the gorgeous "Splendid" collection. I created this layout using photos (taken by Portraits by Susannah) of my husband with one of my daughters and kept the focus on their special relationship. 


I have a fairly simple scrapping style but I like to add a lot of visual interest to my layouts through small details. 


I love clustering embellishments as I did here with some punched butterflies, pearls, patterned paper and a die-cut. 


This section was created by layering die-cuts, a punched butterfly, pearls and a resin flower. 


Supplies:
Authentique: Splendid patterned paper (Foundations back, Majesty back, Richness back, Delight back, Magnificence back); Splendid Noteables; Splendid Headlines back; Splendid Icons; Splendid Tabloids
Prima resin flower
K & Co., American Crafts chipboard alphabet
Martha Stewart butterfly punches
Melissa Frances pearls

Have a great day!

Tuesday, September 06, 2011

Happy 1st Birthday Mini Album

Good Tuesday Morning, to you! Did you have a good long weekend? We went to my parents for the weekend and had a lot of fun visiting my family and eating good food. The entire family went out to a restaurant for the very first time (we tend not to take the girls out to eat very much - it's just easier at this point) and it was really nice to be out with everyone. The girls also had fun playing with their cousins and we even did a photo shoot and I can't wait to scrap those pictures. We came home Sunday evening and then I was able to go out and do a little shopping yesterday. And that was fun for me! :) And today I am very excited for the girls to start Tiny Tumblers at the YMCA. We tried it out later in the spring and the girls loved it so we decided to have them start again this fall. I'm anxious to see how they do this time around. 

Today I have a mini album to share that I created using a Melissa Frances bingo album, glassine envelopes and lots of the the "Confetti" collection by American Crafts. I chose my favorite photos from the girls 1st birthday party and put them together in the album. 


I cut open the glassine envelopes on each side and then punched holes on one side to put in the album. I reinforced each hole with a punched cardstock star. The envelopes open at the cupcake sticker.


For this envelope, I printed wallet size photos of all the party guests and created an accordion fold to fit inside the envelope.


I had even more party guests to fit inside this envelope. 


And there you have it! It is a pretty simple album design and didn't take too long to do. And I love the vintage looking album paired with the bright pops of color from the Confetti collection. 

Have a great Tuesday (even if it feels like Monday!) :)


Saturday, September 03, 2011

Authentique Paper: September Sketch Challenge

Happy Saturday! Two times a month, the Authentique Paper blog will be hosting challenges and the first one is up - a sketch challenge. There's a layout and card sketch to choose from and you have until the 14th to participate. Below is my take on the card sketch using the "Journey" collection. 


Be sure to check out the blog for all the details on how to enter! Have a great weekend! :)

Friday, September 02, 2011

More Echo Park!

Happy Friday, friends! Are you looking forward to the long holiday weekend? I can't believe it's September and I also can't believe how full our month is already and it's just getting started. I'm hoping we can all stay healthy - allergy season and the sick season has already begun. Today I have the last of my Echo Park projects to share with you for Emma's Paperie (although you'll likely begin seeing more projects from me for Emma's Paperie in the very near future...that sounds like a hint!) :)

My next layout tugs at my heart strings...any photo of me and my girls does that. These two are my whole world. I love them so much and after years of heartache, I take advantage of any time I can document my life with them. This was a fun layout to create...a little out of my usual comfort zone. I punched some hearts and used them as a mask to do a little tone-on-tone misting on the grey cardstock. I used a gel pen to highlight the hearts and then punched smaller hearts to go inside. 


Here's a close-up of the misted hearts....


I'm in love with the resin hearts by Melissa Frances.


Next I have a couple of very simple cards to share with you. I love how the Victoria Gardens collection can give two very different looks - one bright and fun, the other muted and soft. 


For this card, I only had the Maya Road rose trim in white so I just misted it silver to go with the colors of the card.


The calendar is just a large sticker and I wrapped twine by My Mind's Eye around it. 


For my last project, I was very inspired by the talented Melissa Phillips who is always making cute bird creations. I used a nest by Melissa Frances and a chipboard bird by Maya Road. I filled the nest with lots of little goodies, Melissa Frances tissue trim, a resin star, pink floral pick and then a stick pin by Maya Road. A fun little piece of home decor!


Thanks so much for all your sweet words about my projects! I have been blogging quite a bit this week and will be back tomorrow with my first project for Authentique Paper

See you then! :)


Thursday, September 01, 2011

Noel Mignon Challenge: Summer

Good morning! Today I have a new layout for the Noel Mignon challenge blog using "The Bee's Knees" kit. I have about a million photos from this summer so I decided to just focus on one activity that we did a lot of - swimming! My girls love the water and Nora surprised the heck out of us a couple weeks ago when she took off "swimming" across the splash pool. She was on her belly moving her arms and legs traveling across the pool...maybe it's time for lessons!? I created a polaroid effect just by simple cropping of my photos and ran a 70s vintage action on them in Photoshop to better match the colors of my patterned papers. 

'

I love mixing and matching alphabet stickers to create fun titles. 


This was a fun section to piece together...lots of patterned paper and an Elle's Studio die-cut.


Here I layered together a couple Sassafras stickers and a punched scalloped circle from patterned paper by GCD Studios. 


I'll be back tomorrow with the rest of my Echo Park projects for Emma's Paperie. 

Have a great day! :)

Wednesday, August 31, 2011

Echo Park: Victoria Gardens

Good morning! Today I have my projects to share using Echo Park's "Victoria Gardens" collection, all created for my guest design spot with Emma's Paperie. I love how the chevron trend has taken off and to me it just screams Easter eggs! I created this two-page layout of my girls with their Easter baskets this past spring. I cut the chevron pieces from a variety of patterned papers in the collection. 


I cut the eggs (ovals) with my Cricut and masked and misted the grey with a punched heart. 


Check out that pouty face (Nora)! 


The next layout is all Miss Lily and is actually from Easter too, but you couldn't tell it from the photos. I cut the hexagons using my Cricut again and used one as a journaling block. The sticker on the side is also by Echo Park. 


I love mixing and matching alphabet fonts! The resin heart is by Melissa Frances. 


Here's a closer look at the hexagons. I misted the background with white mist by Studio Calico and then added a few colors on top of the hexagons. 


I'll be back tomorrow with a project for Noel Mignon and then back again Friday with the rest of my guest projects. 

Have a good one! :)

 
Site Design By Designer Blogs