Wednesday, January 09, 2013

Emma's Paperie: Hey, Grandpa

Good morning! If you are looking for my Little Yellow Bicycle giveaway post, visit here (it's open until Friday!). Today I have a layout to share with you for Emma's Paperie featuring Lily Bee Designs. I have always been a huge fan of Lily Bee and their fall collections have especially been some of my favorites. I created a two-page layout of some of my favorite photos from a visit to the pumpkin patch this fall with Glen's parents.


I even did some stamping with a Cocoa Daisy Mod Leaf stamp and gold ink and embossing powder. The tags are all from Elle's Studio.


Here I mixed and matched some alphabet stickers from Lily Bee, Crate, SEI and American Crafts. I also pulled out the gold again with this Dear Lizzy gold polka dot vellum. 


And here I border punched some pumpkins and backed them with patterned paper and added gold sequins here and there.  


For a complete supply list, please visit Emma's Paperie here.

And please do stop back tomorrow....I'll be sharing layouts that I created with each of Simple Stories new collections for Winter CHA!

Tuesday, January 08, 2013

Little Yellow Bicycle: Winter Fun Decor & Giveaway

Good morning! I have one last project to share with you for Little Yellow Bicycle and their "Winterings" collection. I also have a little giveaway at the end of this post.

For my last project, I wanted to create a home decor piece that I could put on my fireplace mantel. We had a blizzard here right before Christmas and my girls had so much fun playing outside in the snow.

I printed my favorite Instagram photos to 1.5" and decorated a very old coin folder (Bazzill made these several years ago) that I had in my stash. This was a great opportunity to use up my favorite bits and pieces in the Winterings collection. I punched patterned paper circles, layered die-cut snowflakes, and embellished with stickers, pearls and sequins.


And here's my giveaway for today...Little Yellow Bicycle was so generous that I had some beautiful product leftover from my projects and I decided to share it with one of my blog readers.

Just leave me a comment sharing your favorite winter activity (indoors or outdoors) and I'll draw and announce a winner this Friday.


Thanks for stopping by today! And don't forget to leave a comment! :)

Monday, January 07, 2013

Little Yellow Bicycle: Warm Winter Wishes Cards

Good morning! Today I have a card set to share I created for Little Yellow Bicycle as their guest designer for the Winterings collection. I love creating quick and easy cards to send to friends and family. The embellishments in this collection made it easy to do!


The "Brrr..." card is composed entirely of die-cuts, stickers and transparencies - not a scrap of patterned paper in sight.


For the "Winter Wishes" card, I layered die-cuts, chipboard and transparencies to create a winter scene. 


Thanks for stopping by today! Tomorrow I'll share my final project for Little Yellow Bicycle plus have a little giveaway! Have a great day! 


Sunday, January 06, 2013

Emma's Paperie: Yum

Good morning! Just thought I would hop on here today so I could catch up on posting projects and let's hope I'll remember to blog everyday this week! :) Today I have a layout to share for Emma's Paperie. The designers recently focused on wood grain and this is what I came up with using the Clippings collection from Basic Grey. The photos are of the girls from Thanksgiving last year.


The wood frame is by My Mind's Eye and I split it to use in a couple different places.


The wood veneer letters are from Pink Paislee.


For a complete supply list, please visit Emma's Paperie here.

Thursday, January 03, 2013

Webster's Pages: Little Farmer's Market Shoppers

Good morning and Happy New Year! So I've had good intentions of posting lately and then Monday night I did something so totally stupid that I've been off track ever since. I somehow managed to kick a base board as I was turning a corner and broke my little toe on my right foot. Ow. ow. ow. is all I have to say. I have tried to stay off my feet as much as possible but we had company New Year's Eve so I still had to cook and clean and entertain. Needless to say, a broken toe was not in the plan for the new year. I'm trying to tough it out though and hopefully won't be laid up too much longer. Good grief!

For today, I have a new layout to share using the "Sweet Notes" collection by Allison Kreft for Webster's Pages. I decided to use a white background on this one so the colors would pop off the page and cut up some of the journaling cards as the bases for my 2x3 photos of the farmer's market this summer. The girls had a little lesson on money and where we get our food. Fun! :)


Had fun layering with vellum, patterned paper, journaling cards and wood veneer frames from Studio Calico...


Also really loving the transparency journaling cards in the collection...I used one behind the photo here and cut up the arrows to place around the layout as embellishments.


Thanks so much for stopping by today! I'll try to get back to my regular posting soon!

Thursday, December 27, 2012

American Crafts: New Year's Eve Count Down Bags

Good morning! Today I have a quick and easy tutorial to share with you for New Year's Eve Count down Bags that I made for the American Crafts blog. Our New Year's Eve celebrations have certainly changed over the years and now we celebrate at home with our family.

I love the pretty, glittery gold in the 5th & Frolic collection and was inspired by it to create a set of New Year's countdown bags to ring in the new year with my family! Inside each bag is a tag with a family friendly activity such as playing a board game together, lighting a fire and drinking hot chocolate, etc. The larger paper bags could also hold a treat or little gifts. A sprinkle of confetti is also in each bag. Depending on the ages of your children, you could start the countdown earlier in the day and adjust the number of bags you use accordingly.


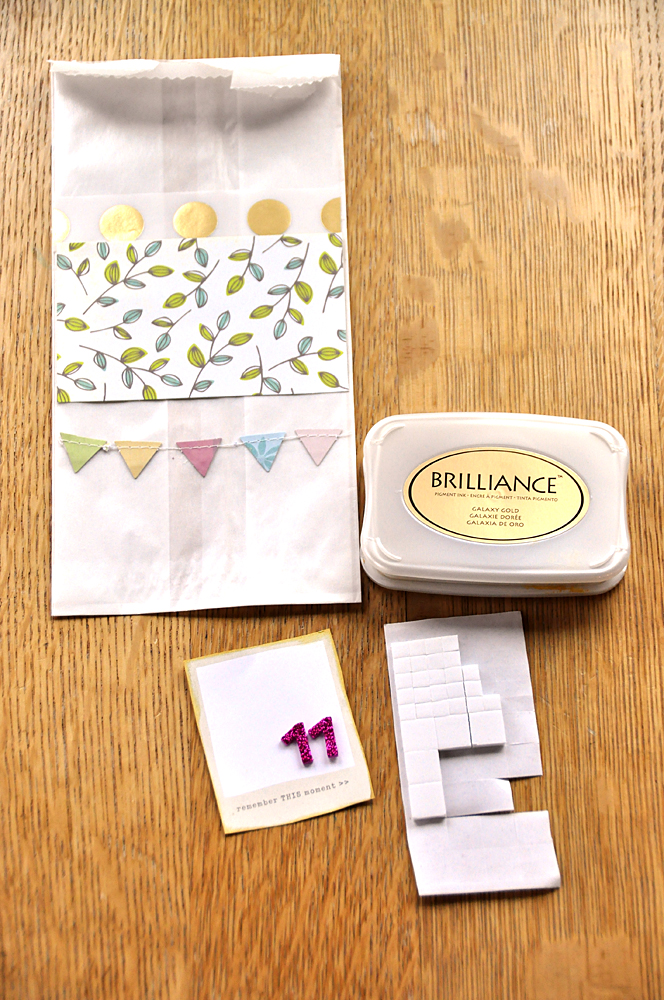
1) Cut a piece of patterned paper to fit the front of a glassine or paper bag. Cut a strip of gold polka dot vellum and adhere it to the top of the bag. Cut 3-5 pieces of the stitched triangle or scallop banner Flutterbys and adhere them below the patterned paper. 


2) Cut out a Polaroid from patterned paper and edge it with gold ink. Add Thickers numbers to the Polaroid then adhere it to the bag with foam adhesive. 


3) Punch confetti from patterned paper and cardstock. 


4) Add sequins to the confetti pile (a little confetti goes a long way!). 


5) Place the confetti in the bag. Add patterned paper or cardstock to a tag with removable adhesive (this way you can reuse the tags on another project). Add a family activity to the tag. Tie ribbon in bow on top.


6) Place the tag in the bag and fold the top over. Punch two holes through the top of the bag and tie ribbon through in a bow. 


Thanks for stopping by today! See you tomorrow! :)

Wednesday, December 26, 2012

Little Yellow Bicycle: Magical First Snow

Good morning! I hope you all had a wonderful Christmas! This was our best one yet! We had so much fun with the girls! But now it's back to the routine for at least a few days until we get to ring in the New Year! Today I have another layout to share with you using the Winterings collection from Little Yellow Bicycle as their guest designer.


These are photos of the girls last fall during our first snow. They were so excited to be outside playing! I made the photos black and white to better coordinate with the Winterings collection. I also created the page on an angle for a twist. I LOVE the transparencies in this collection - the tree and icicles provide the perfect wintry touch!


Thanks so much for stopping by today! More tomorrow... :)

Saturday, December 22, 2012

Simple Stories: Winter Wonderland Home Decor

Good morning! Today I have a "Winter Wonderland" home decor project using Simple Stories' "Handmade Holiday" collection and Helmar 450 Quick Dry Adhesive. The main piece is a flat 5 x7 canvas and I chose to create a neutral piece using the kraft, cream and white in the collection.


I had a chipboard snowflake by Melissa Frances that I drizzled with the Helmar Quick Dry Adhesive and then sprinkled on shaved ice glitter. I then added scraps of pretty lace and pearls to tie in the theme. I also used the Helmar Zapdots in Black to add some dimension behind the snowflakes.


Thanks for stopping by today! We're off to enjoy an early Christmas with my family but I'll be sure to check in on Christmas. Enjoy your weekend! :) 

Friday, December 21, 2012

Little Yellow Bicycle: I Love Gently Falling Snow

Happy Friday! Just wanted to share a new layout with you using the "Winterings" collection from Little Yellow Bicycle. I am excited to be guest designing for them with this collection over the next few weeks.


A few weeks ago, we had our first snowfall in Des Moines and this was the view from my sun porch that morning. I just sat and enjoyed a cup of coffee and looked out into my back yard. It was so pretty and peaceful that I snapped a photo so I could remember that moment.


That lacy looking pattern is vellum tape - I LOVE it! And LYB has a lot of options for alphabet stickers in this collection that I mixed and matched here.


And I really love the transparency pieces too - check out that glittery snowflake!


So, so pretty! Thanks Little Yellow Bicycle for having me. I'll have a new project on their blog every Friday for the next few weeks.

Have a great day! I'm busy, busy here with last minute preparations! :)

Thursday, December 20, 2012

Elle's Studio: December Gallery

Oh, the weather outside is frightful...I am cozy and warm in my house today as the wind is howling outside and we're in blizzard conditions. The entire city is pretty much shut down for the day so I'm taking advantage of this snow day to get caught up and work on my mile-long to-do list. Today I want to share my work for the December gallery at Elle's Studio. I used the December kit from Noel Mignon to create this month - her Christmas kit is always a favorite!

I was instantly drawn to the religious tags in the "Be Merry" collection and knew that I wanted to create a layout about a new tradition we started last year - singing "Happy Birthday" to Jesus. 


I inked the wooden star with gold ink and heat embossed it. 


Love that "He is the reason for the Season" tag! We definitely have a lot of fun with Christmas - crafting, baking, Santa, etc. but it is so important to us that the girls know WHY we celebrate.


And here's a page that is actually current to this year! The girls were more than excited to help decorate the tree this year and they were the official light bulb testers - hence the title!


And finally, I also created a card using the exclusive stamps. I actually stamped the sentiment in two shades of green ink and then heat embossed.


I also inked and embossed the tree with gold ink. Thanks for stopping by today! Keep warm! :)


Site Design By Designer Blogs